Since nowadays, an SSL certificate is essential for every website or blog, we will explain how you can add it to your WordPress installation.
Who wouldn’t prefer a safe website to navigate and send personal data? While the internet would never be 100% safe, every website must protect its data and visitors’/customers’ data.
Firstly, let’s understand what an SSL certificate is and why it is important.
SSL certificate: What it is
We won’t be very tech-savvy here. We need to know that SSL (Secure Sockets Layer) is a protocol that uses cryptography to protect the connection between computers in a network. We use the replacement of SSL, which is the TLS (Transport Layer Security) protocol.
So the data that a visitor gives to a website is protected by a security protocol. This data can be, for example, an email and information that you can add to a contact form or bank card details when you purchase online. Additionally, the SSL certificate can verify that a website is what it shows. For example, there are cases of fake websites pretending they are another to deceive visitors and get emails or bank card details.
The SSL certificate we use for secure web browsing is the HTTPS that we see in a webpage URL instead of the HTTP we used in previous years.
Except for the HTTPS on the address bar, this certificate shows a padlock browser sign next to it. You can get more information about the certificate and the website if you click on this padlock.

SSL certificate: Why it is important
Safety
As we’ve already explained, the SSL certificate is essential to keep a website securely communicating with its visitors. Also, a website can verify its identity through SSL.
Reputation
So, the above can lead to more visitors and customers when we’re talking about e-commerce websites. How many visitors would buy online from a website that shows a non-secure connection sign? Even if it is not an online store, a website’s reputation can fall significantly when there is no verification of its authentication and data protection.
SEO
Google uplifts websites that have SSL protection. So, your website will rank higher than similar websites not protected by a certificate. In addition, it helps with website loading speed which is also valuable for SEO, website reputation, and visitors’ conversion to customers.
Necessary for payment methods
If you have an online store, you will need to prove that the connection to your website is secure. Most payment companies demand an SSL certificate for online transactions. So, it is the first thing you must do before launching your e-shop.
How to start: Get a certificate
There are free or paid certificates. You can ask your hosting provider if they offer a free SSL certificate. Alternatively, they could offer paid certificates or suggest other certificate providers.
SSL certificates are separated into those for:
- One domain
- One domain and its sub-domains
- Multiple domains and subdomains
Last, you can find self-hosted and third-party SSL certificates. The SSL type you will choose depends on the company you have and the kind of website you need.
Move from HTTP to HTTPS
Now that you got a certificate, it’s time to move your website from HTTP to HTTPS. Before you proceed, creating a backup of your website is necessary. You can do this with a third-party plugin or from your server.
Plugins
There are third-party SSL plugins that can move your website to HTTPS. It is the easiest and fastest method to add SSL to your website. This means that it is also more suitable for non-advanced WordPress users.
A popular SSL plugin is the Really Simple SSL plugin. It is an amazing plugin that you can show the padlock on your website in just a few minutes.
Firstly, install and activate the plugin. Once the plugin is activated, you will get a notification to click “Activate SSL”, and that’s it! You’re ready.
Make sure the certificate has been set properly by clearing your cache and looking in the address bar for the padlock. Don’t forget to check all your pages, posts, etc.
Manually
Furthermore, you can move to HTTPS manually. This method is for more advanced users but, in some cases, could be more efficient than just using a plugin.
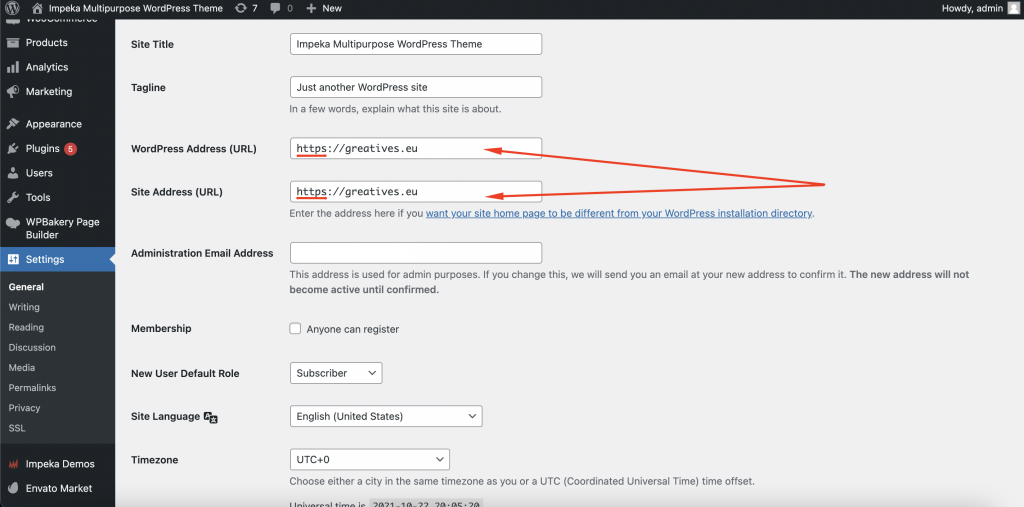
First, you must change the website URL under Settings > General, WordPress Address and Site Address.
Next, you need to make some changes in the .htaccess file of your WP installation. You can add the following:
<IfModule mod_rewrite.c>
RewriteEngine On
RewriteCond %{HTTPS} off
RewriteRule ^(.*)$ https://%{HTTP_HOST}%{REQUEST_URI} [L,R=301]
</IfModule>
and for Nginx servers, use the code below by replacing it with your URL:
server {
listen 80;
server_name example.com www.example.com;
return 301 https://example.com$request_uri;
}
It is better to add SSL to your website before the website development. But sometimes this is not possible. If you encounter mixed content issues, you can also use a third-party plugin to discover and fix these errors.
To sum up
Adding SSL encryption to your website is one of the necessary steps you should have in mind. Validated websites can lead to increased traffic, so more potential customers. Also, you will have added one more shield to your overall website security.
If you need more information about which SSL you should choose or how to move your WordPress website to HTTPS, you can contact your hosting provider or hire a professional.